This digital contract requires traders to predict whether the exit spot will be above or below a specific, custom-set price level known as the Barrier. Instead of betting on the Exit Spot relative to your entry price, you bet on the Exit Spot's position relative to this user-defined target price. This precision control transforms you from a directional trader into a strategic price-target trader.
Welcome to Lesson 2
You have mastered Rise/Fall - the foundational directional bet. Now it is time to level up your precision.
The limitation of Rise/Fall: You are locked into comparing the Exit Spot to your Entry Spot. The market decides your reference point.
The power of Higher/Lower: YOU choose the reference point. You define the Barrier. You trade against YOUR chosen price target, not the market's Entry Spot.
Strategic Precision: If you believe Volatility 75 will reach 45,000 but not exceed 46,000, you can set a Barrier at 46,000 and trade Lower. If you see strong support at 44,500, set Barrier there and trade Higher. This is not direction trading - this is price-target trading.
Lesson Chapters
1Chapter 1: Introduction and Definition~3 min
The Higher/Lower contract is a variant of a directional Digital Option that introduces a custom Barrier. Instead of betting on the Exit Spot relative to your entry price, you bet on the Exit Spot's position relative to this user-defined target price.
🎯 What Makes Higher/Lower Different
Rise/Fall Contract:
- Reference Point: Entry Spot (the price when you buy)
 - Fixed by the market
 - You adapt to the market's timing
 
Higher/Lower Contract:
- Reference Point: Custom Barrier (the price YOU define)
 - You set the offset (e.g., +1.5 points or -0.8 points above/below current price)
 - The market adapts to YOUR target
 
Example:
- Volatility 75 currently at 45,250
 - Rise/Fall: Compares Exit Spot to 45,250 (locked)
 - Higher/Lower: YOU set Barrier at 46,000 or 44,500 (your strategic choice)
 
How You Define the Barrier
⚙️ Barrier Offset Mechanism
You define the Barrier by using an offset - a number of points/pips above or below the current market price.
Positive Offset (+): Barrier above current price
- Current: 45,000
 - Offset: +500
 - Barrier: 45,500
 
Negative Offset (-): Barrier below current price
- Current: 45,000
 - Offset: -500
 - Barrier: 44,500
 
Platform Calculation:
Barrier = Current Price + Offset
The platform automatically calculates and displays the exact Barrier price before you execute.
Why This Matters: By controlling the Barrier, you trade market structure (support/resistance, psychological levels, breakout points) instead of arbitrary entry timing. This is the foundation of professional technical trading.
2Chapter 2: The Mechanism~5 min
The core mechanism is determined by the custom Barrier, which you set before executing the trade.
📐 Win/Loss Conditions
Higher: You win if Exit Spot > Barrier (strictly)
- Barrier: 45,000
 - Exit Spot: 45,001 ✅ Win
 - Exit Spot: 45,000 ❌ Loss (tie = loss)
 - Exit Spot: 44,999 ❌ Loss
 
Lower: You win if Exit Spot < Barrier (strictly)
- Barrier: 46,000
 - Exit Spot: 45,999 ✅ Win
 - Exit Spot: 46,000 ❌ Loss (tie = loss)
 - Exit Spot: 46,001 ❌ Loss
 
Critical Rule: If the Exit Spot equals the Barrier, the trade is a loss, not a push or refund.
🎯 Higher Scenarios in Action
✅ Higher Success

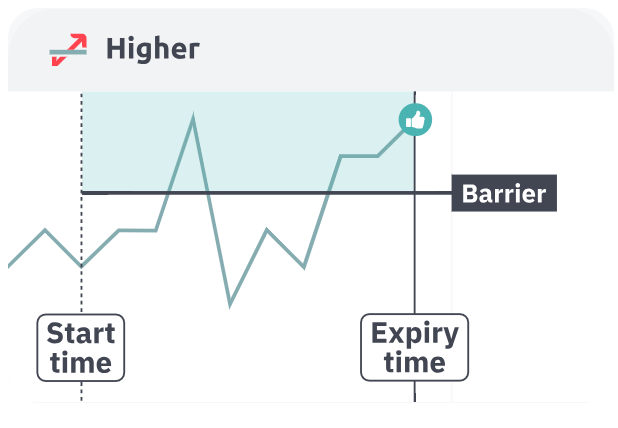
Price ends above barrier = Win
❌ Higher Failure

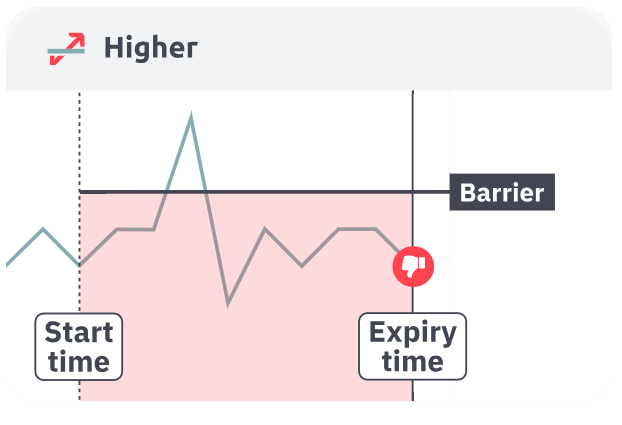
Price ends below barrier = Loss
Understanding Higher Predictions:
- Success: When you predict Higher and Exit Spot is above the custom Barrier
 - Failure: When you predict Higher but Exit Spot is below the custom Barrier
 - Visual Indicators: Clear success/failure outcomes shown in the diagrams
 
🎯 Lower Scenarios in Action
✅ Lower Success

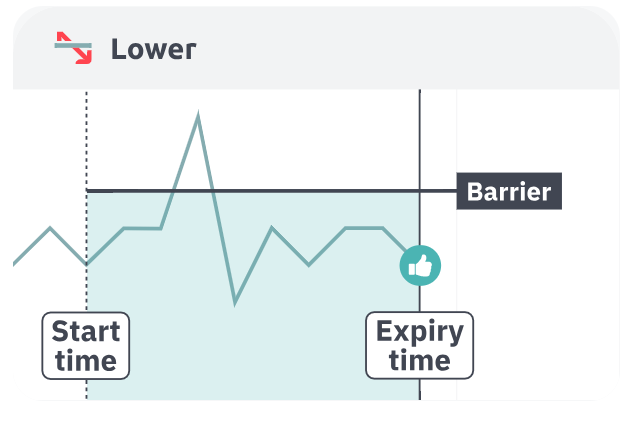
Price ends below barrier = Win
❌ Lower Failure

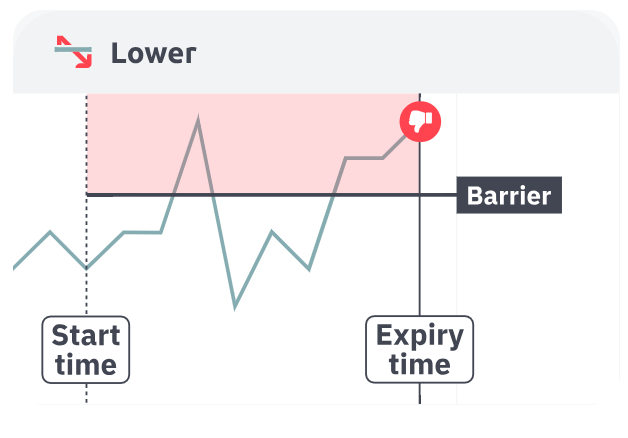
Price ends above barrier = Loss
Understanding Lower Predictions:
- Success: When you predict Lower and Exit Spot is below the custom Barrier
 - Failure: When you predict Lower but Exit Spot is above the custom Barrier
 - Visual Indicators: Clear success/failure outcomes shown in the diagrams
 
Payout and Probability Relationship
💰 The Distance-Payout Dynamic
The Golden Rule:
The further away you place the Barrier from the current price, the harder it is for the market to reach. This lower probability translates into a significantly higher fixed payout. Conversely, placing the Barrier close offers a lower payout but a higher chance of success.
Probability Impact:
| Barrier Distance | Probability | Payout % | Example | 
|---|---|---|---|
| Very Close (±100 points) | ~60-70% | 40-60% | Safe bet, small reward | 
| Moderate (±500 points) | ~50-60% | 70-100% | Balanced | 
| Far (±1,500 points) | ~35-45% | 120-180% | High risk, high reward | 
| Extreme (±3,000+ points) | ~20-30% | 200-350%+ | Very high risk | 
Real Example (Volatility 75 at 45,000):
- Trade A: Barrier at 45,200 (+200), Payout 65%
 - Trade B: Barrier at 46,000 (+1,000), Payout 140%
 - Trade C: Barrier at 47,500 (+2,500), Payout 280%
 
The difference: Trade C offers 4.3x the payout of Trade A, but only ~25% win probability vs ~65%.
Professional Insight: The payout percentage IS the probability signal. If you see 250% payout, the market calculates ~29% win chance (1 / 3.5 = 0.29). Use this as a reality check - if you believe win rate is 50% but payout is 150%, the market disagrees. Trust the math.
Apply What You've Learned — Master Higher/Lower Barrier Trading in Action
Open a free demo account to practice Higher/Lower contracts with custom barriers
Powered by Deriv — Trusted by 3M+ traders worldwide since 1999
or upgrade anytime to live trading
Trading involves risk. Start with a demo to build confidence before going live.
3Chapter 3: Key Features and Flexibility~4 min
🔧 Contract Parameters
| Feature | Description | 
|---|---|
| Asset | Available on all major asset classes, particularly useful on Synthetic Indices (Volatility 75, Volatility 100, etc.) for their clear, consistent movements. Also available on Forex, Commodities. | 
| Duration | Flexible, but often used for slightly longer durations (e.g., 1 to 30 minutes) to give the market time to reach the custom barrier. Can also use tick-based durations (5 ticks, 10 ticks). | 
| Payout Style | Fixed Payout. The payout percentage is highly sensitive to the distance of the Barrier, allowing for very high payouts (e.g., 300%+) on distant barriers. | 
| Unique Condition | Requires setting a customizable Barrier offset (e.g., +1.5 points or -0.8 points) before contract execution. This is what differentiates Higher/Lower from Rise/Fall. | 
| Risk | Loss is strictly limited to your initial Stake amount. No margin calls, no slippage beyond your stake. | 
Barrier Placement Strategy
📊 Strategic Barrier Distance Guidelines
Close Barriers (Conservative):
- Use when: High confidence in direction, want high win rate
 - Distance: ±100-300 points from current price
 - Payout: 50-80%
 - Win Rate Needed: 56-67%
 - Example: Support/resistance bounce plays
 
Moderate Barriers (Balanced):
- Use when: Moderate confidence, balanced risk/reward
 - Distance: ±500-1,000 points
 - Payout: 90-140%
 - Win Rate Needed: 42-53%
 - Example: Trend continuation plays
 
Far Barriers (Aggressive):
- Use when: High volatility expected, trading extremes
 - Distance: ±1,500-3,000 points
 - Payout: 150-300%+
 - Win Rate Needed: 25-40%
 - Example: Post-news volatility, breakout scenarios
 
Implied Probability Formula: Win Rate Needed ≈ 1 / (1 + Payout%). A 150% payout implies 40% win rate needed (1 / 2.5 = 0.40). Always calculate this before trading - it is your probability reality check.
4Chapter 4: Risk and Reward Profile~4 min
⚠️ Risk Warning: High payouts are attractive, but they reflect low probability. When setting a Barrier far away, you are trading on the premise that the market will not just move, but generate enough volatility to clear that custom target. Over-leveraging based on high payout percentages is a common mistake. Only trade with money you can afford to lose.
🛡️ Risk Profile
Risk is Limited:
- Maximum Loss: Your stake amount only
 - No margin calls: Cannot lose more than you invest
 - No slippage beyond stake: Payout is fixed at purchase
 - Barrier tie risk: If Exit Spot = Barrier, you lose (not a push)
 
Risk Management Rules:
- Never risk more than 1-2% of account per trade
 - Do not chase high payouts (200%+) without statistical edge
 - Calculate implied probability before every trade
 - Factor in volatility - do not set barriers right at support/resistance where price might consolidate
 
💎 Reward Profile
Reward is Fixed but Amplified:
- The reward is fixed at purchase (no partial profits)
 - Payout percentage can be highly amplified by choosing a challenging (far-away) Barrier
 - Range: 40% (very close barrier) to 400%+ (extreme barriers)
 - Amplification Strategy: Distant barriers allow you to risk $10 to win $40-50 if your analysis is correct
 
Example Profitability:
| Strategy | Payout % | Win Rate | Result | 
|---|---|---|---|
| Conservative (Close Barrier) | 60% | 65% | ✅ Profitable (+4% edge) | 
| Balanced (Moderate Barrier) | 120% | 48% | ✅ Profitable (+2.5% edge) | 
| Aggressive (Far Barrier) | 200% | 35% | ✅ Profitable (+1.7% edge) | 
| Aggressive (Chasing Payout) | 250% | 25% | ❌ Losing (-3.6% edge) | 
The Math: (Win Rate × Payout) - (1 - Win Rate) = Edge
- Example: (0.35 × 2.00) - (1 - 0.35) = 0.70 - 0.65 = +0.05 edge (5% per trade)
 
Professional Approach: Focus on Barriers at key technical levels (support/resistance, round numbers like 45,000, 50,000). These levels act as magnets or rejection zones, increasing your win probability above the market-calculated rate. This is where your edge comes from.
5Chapter 5: Best-Use Scenarios~5 min
Higher/Lower is the optimal contract for traders who can estimate the distance a price is likely to travel, rather than just the direction.
✅ Perfect Use Cases
1. Targeting Key Technical Levels
Scenario: EUR/USD is at 1.0850, strong resistance at 1.0900 Strategy: Set Barrier at 1.0900, trade Lower (betting price stays below resistance) Duration: 15-30 minutes Logic: Resistance acts as rejection zone, high probability price stays below Example Payout: 85% (moderate probability)
2. Trading Extreme Volatility Expectations
Scenario: NFP report in 5 minutes, Volatility 75 at 45,000 Strategy: Set Barrier at 47,000 (+2,000), trade Lower OR at 43,000 (-2,000), trade Higher Duration: 5-10 minutes post-news Logic: Massive price move expected, but unlikely to reach extreme barriers Example Payout: 220% (low probability, high reward for correct extreme call)
3. Support/Resistance Bounce Plays
Scenario: Volatility 100 bouncing off 55,000 support for third time Strategy: Set Barrier at 54,800 (below support), trade Higher (betting support holds) Duration: 10-15 minutes Logic: Support has held twice, high probability of third bounce Example Payout: 70% (high probability, moderate reward)
4. Range-Bound Trading
Scenario: Volatility 75 oscillating between 44,500-45,500 for 2 hours Strategy:
- When near 44,500: Set Barrier at 44,400, trade Higher
 - When near 45,500: Set Barrier at 45,600, trade Lower Duration: 5-10 minutes Logic: Range-bound markets respect boundaries until breakout Example Payout: 60-75% per trade (multiple trades as price bounces)
 
❌ Avoid These Conditions
- Highly volatile, unpredictable markets: Random spikes can hit distant barriers unexpectedly
 - Right before major news: Impossible to estimate distance accurately
 - Illiquid assets/times: Erratic movement makes barrier distance unpredictable
 - Uncertain market direction: If you only know direction (not distance), use Rise/Fall instead
 - Barriers too close to pivot points: Price consolidating at barriers creates tie-loss scenarios
 
6Chapter 6: Step-by-Step Trade Execution~5 min
How to Execute a Higher/Lower Trade on Deriv Trader
📋 Complete Execution Workflow
Step 1: Select Contract Type
- Navigate to Trade → Options → Digital Options
 - In contract type dropdown, select "Highs/Lows"
 - Then select "Higher/Lower"
 
Step 2: Define the Barrier (MOST CRITICAL STEP)
- Locate the "Barrier offset" input field
 - Enter your offset value:
- Positive value (+1.00) = Barrier above current price
 - Negative value (-1.00) = Barrier below current price
 
 - Platform calculates: Barrier = Current Price + Offset
 - Visual confirmation: Platform shows exact Barrier price AND draws Barrier line on chart
 - Always verify visually before proceeding
 
Step 3: Set Duration and Stake
- Choose expiry: Ticks (5, 10, etc.) or Time (1 min, 5 min, 30 min, etc.)
 - Enter stake amount (e.g., $10)
 - Platform instantly displays:
- Exact Barrier price
 - Payout percentage (this is your probability signal!)
 - Potential return
 
 
Step 4: Choose Direction (Higher or Lower)
- If Barrier is BELOW current price:
- Click "Buy Higher" (predicting Exit Spot > Barrier)
 
 - If Barrier is ABOVE current price:
- Click "Buy Lower" (predicting Exit Spot < Barrier)
 
 
Critical Note: The choice defines which side of the Barrier is the win zone, not necessarily the direction from your Entry Spot.
Step 5: Execute and Monitor
- Final review: Barrier price, Direction, Duration, Stake, Payout %
 - Click "Purchase" to execute
 - Trade appears in "Portfolio" tab
 - Monitor: Current price vs Barrier (shown on chart)
 - At expiration, platform automatically settles
 
Example Strategy: High Payout/Distant Barrier
💡 Real Strategy Walkthrough
The "High Payout/Distant Barrier" Strategy:
Objective: Exploit low-volatility periods with high payout bets on continued consolidation.
Setup:
- Asset: Volatility 100 Index
 - Current Price: 50,000
 - Market Condition: Ranging between 49,500-50,500 for 45+ minutes (tight consolidation)
 - Analysis: Low volatility likely to continue for next 10-15 minutes (statistical probability)
 
Execution:
- Set Barrier offset: +2,500 (Barrier = 52,500)
 - Direction: Buy Lower (betting price stays below 52,500)
 - Duration: 15 minutes
 - Stake: $10 (1% of $1,000 account)
 - Payout: 230% ($33.00 return, $23.00 profit)
 
Logic:
- Barrier is 2,500 points away (+50% from current price)
 - In current low-volatility environment, price spiking +50% in 15 minutes is statistically unlikely
 - High payout (230%) compensates for the small risk that volatility suddenly explodes
 - Implied probability: 1 / 3.30 = 30%
 - Your edge: Historical analysis shows this consolidation type stays within 40% range 85% of the time
 
Risk Management:
- Only use after 30+ minutes of confirmed consolidation
 - Never chase 200%+ payouts without statistical justification
 - Limit stake to 0.5-1% of account (high payout ≠ low risk)
 - Set mental stop after 3 consecutive losses (strategy invalidated)
 
7Chapter 7: Summary, Common Mistakes, and Quiz~7 min
Summary
Key Principles (0/5)
Common Mistakes and How to Avoid Them
⚠️ Top 5 Mistakes
| Common Mistake | Why It Happens | How to Avoid It | 
|---|---|---|
| Ignoring the Barrier Tie | If the Exit Spot equals the Barrier, the trade is a loss. Traders forget this and set barriers right at support/resistance. | Always factor in enough room for error or slippage near the barrier. Set barrier 50-100 points away from key levels. | 
| Barrier Offset Errors | Mixing up the sign (positive/negative) of the Barrier offset. Setting +500 when you meant -500. | Always confirm the Barrier position visually on the chart before executing. Use the chart line as final verification. | 
| Chasing High Payouts | Seeing 300% payout and thinking it is easy money without calculating probability. | Calculate implied probability: 1 / (1 + 3.00) = 25%. Ask: Do I really have 25%+ edge here? If not, skip the trade. | 
| Using Higher/Lower Like Rise/Fall | Setting barrier very close to current price (defeats the purpose). | If you only know direction (not distance), use Rise/Fall instead. Higher/Lower is for price-target trading. | 
| Ignoring Market Context | Using distant barriers during high volatility when price can easily reach them. | Match barrier distance to current volatility. Low volatility = distant barriers safe. High volatility = close barriers only. | 
Compare With Other Contracts
📊 Contract Type Comparison
| Feature | Higher/Lower | Rise/Fall | Touch/No Touch | 
|---|---|---|---|
| Reference Point | Custom Barrier (YOU set it via offset) | Entry Spot (fixed at contract start) | Custom Barrier (YOU set it via offset) | 
| Win Condition | Exit Spot must be above/below Barrier at expiration | Exit Spot must be above/below Entry Spot at expiration | Price must touch/not touch Barrier at any time during contract | 
| Payout Sensitivity | High (varies dramatically by Barrier distance: 50% to 400%+) | Low (only varies by duration/asset: typically 70-95%) | Very High (varies by Barrier distance + duration: 100% to 1000%+) | 
| Best For | Estimating price travel distance + direction | Estimating direction only | Predicting volatility spikes or extreme consolidation | 
| Barrier Control | ✅ Full control (you set offset) | ❌ No control (Entry Spot is automatic) | ✅ Full control (you set offset) | 
| Timing Matters | Only at expiration | Only at expiration | Any time during contract (instant settlement on touch) | 
Decision Framework: Can you estimate how far price will move? → Higher/Lower. Only know direction? → Rise/Fall. Know volatility level (spike or calm)? → Touch/No Touch.
Try It on Demo (Challenge Task)
🎯 Your LeTechs Demo Task: Test Barrier Impact
Objective: Experience how Barrier distance directly affects payout and understand probability signals in real-time.
Instructions:
- Switch to Demo Account on Deriv platform (use virtual money, zero risk)
 - Select Volatility 75 Index (consistent movement, ideal for learning)
 - Place Trade A:
- Barrier offset: +200 points (close barrier)
 - Direction: Lower (predicting price stays below)
 - Duration: 5 ticks
 - Stake: $10
 - Note the payout % (likely 55-65%)
 
 - Immediately Place Trade B:
- Barrier offset: +500 points (moderate distance)
 - Direction: Lower (same prediction)
 - Duration: 5 ticks (same as Trade A)
 - Stake: $10 (same as Trade A)
 - Note the significantly higher payout % (likely 95-115%)
 
 - Place Trade C (Advanced):
- Barrier offset: +1,000 points (far distance)
 - Direction: Lower
 - Duration: 5 ticks
 - Stake: $10
 - Note the payout % (likely 160-200%+)
 
 
Reflect:
- The difference in payout represents the market's calculated difference in probability
 - Trade A: High probability, low payout (safe)
 - Trade C: Low probability, high payout (risky)
 - Which Barrier placement gives you the best risk/reward balance?
 - Is the higher payout justified by the reward in your current market analysis?
 
Key Lesson: Payout % is your probability signal. Trust the math, not your emotions or payout attraction.
Quiz
What is the key difference between Higher/Lower and Rise/Fall options?
Answer:
Higher/Lower compares Exit Spot to a customizable Barrier (YOU set it via offset), while Rise/Fall compares to Entry Spot (the price when contract starts). This Barrier control makes Higher/Lower strategic for trading price-target levels.
You trade Lower with Barrier at 46,000. At expiration, price is exactly 46,000. What happens?
Answer:
You lose. Higher/Lower options require Exit Spot to be strictly above (Higher) or strictly below (Lower) the Barrier. If Exit Spot equals Barrier, it is a loss, not a push. This is why you should set barriers with room for error, not right at key levels.
A Higher/Lower trade offers 180% payout. What is the implied win probability the market calculates?
Answer:
36% win probability. Formula: Implied Probability = 1 / (1 + Payout%) = 1 / (1 + 1.80) = 1 / 2.80 = 0.357 (36%). High payouts always indicate lower probabilities. Before taking a 180% payout trade, ask yourself: Do I have statistical evidence of 36%+ win rate?
Practice Barrier-Based Directional Trading
Master the art of custom barrier placement with Higher/Lower contracts.

Deriv
- Zero-spread accounts for tighter entries
 - Swap-free (Islamic) available
 

XM
- Consistently low spreads on majors
 - Micro accounts — start with a smaller risk
 - Swap-free (Islamic) available
 - No trading commission
 
Prerequisites
Before studying this lesson, ensure you have mastered:
- Rise/Fall: Trading Directional Predictions - Understanding directional digital options and Entry Spot mechanics
 
Ready to unlock precision trading with custom Barriers? Understanding Higher/Lower transforms you from a direction trader into a strategic price-target trader.
Ready to continue?
Mark this lesson as complete to track your progress.